
Let's Play Monster Quest part 15

After a couple of breather missions, we get probably the hardest chapter in the entire game!
Yes, seriously.
This mission sucks. It sucks so much. Getting through it at all, let alone while getting all the goodies, is largely a luck-based mission if you aren't grinding to an insane extent on the map monsters/at the Tower of Valni. You can't play defensively, because you barely have enough time to get everything done if you play aggressively, and anyway playing defensively doesn't really increase your ability to control the fight, it just makes it likely that you'll be mobbed all at once at some point, rather than getting mobbed more piecemeal.
Every time I complete this mission I breathe a little sigh of relief that I'll "never" have to do it again.
I got really lucky and didn't have to retry this mission a zillion times. I still had to retry it a few times, just not as many as I feared.
I honestly don't know what Intelligent Systems was thinking with this mission. It's pretty obvious that Ephraim's path is intended to be the overall harder of the two -he pretty directly "upgrades" the Castle Renais mission to be harder by adding another Siege Tome guy, as one of the bluntest examples- but nothing in his path comes close to the madness of Hamill Canyon.
I've also always found it puzzling that the Chapter name is literally just the location name. That's... very unusual. It has me wondering if Intelligent Systems never had any idea what the plot significance of the mission would be -pretty much the only reasonably plot-relevant event to happen here is the reveal that L'arachel is princess of Rausten, which... has a pretty generous range in which it could happen without distorting the plot. So Hamill Canyon is just not that plot-relevant.


Naturally, the enemy forces include a Sleep Staff jerk. This is especially awful since I missed out on the Restore Staff, but having to spend a unit's turn on waking up someone still sucks, just less than having the unit sitting around helpless for five turns.
Also there's a Physic Staff guy with a Red Gem to Steal. Honestly? I completely forget about his Red Gem in this run. I usually don't even try to go for it -it's just not worth the effort, especially since I mostly don't even spend my gold anyway.
I didn't bother to screenshot the boss (Aias), because he didn't stand out. He's got his usual items. Whatever. This includes a Knight's Crest he'll drop on death. I don't always manage to get it because killing him ends the mission prematurely, and I prefer to get as much experience as possible -if you've made it far enough to be reasonably able to kill him, you probably don't need to cut the mission short. There's probably not many enemies left, bar maybe Pablo's reinforcements. I'll admit I have, once or twice, killed Aias because I didn't want to deal with Pablo's forces, but this was very much the exception.


For this run, this was my forces and my starting formation.
I considered Gilliam, but I desperately needed mobility and lethality. His durability just wasn't helpful enough, especially since those Rangers would double him and do good damage in the process.


First Ross heads south to get started on wiping out these Soldiers. Off to a good start.


Tana vaporizes an Archer to the south and then Amelia follows up to prevent the surviving Archer from reaching the Ballista. She gets a quite nice level out of dishing some hurt.


To the north, an equivalent operation is occurring, only it ends with both Archers outright dead.
I really don't want the enemy using Ballista. There's still one Ballista threatening my forces left, but it's not going to be a problem just yet, and I have a plan for killing its Archer safely.

The last movement happens and I end turn looking like this -Eirika placed to bait out a few enemies, including the Knight.


First the Mercenary in the north takes a shot at Colm. Sticking a giant hunk of steel up into Colm's armpit is uncomfortable, but Colm can bear up under it. The Mercenary dies for his trouble.


The Knight goes for Eirika, and since she's wielding a Lancereaver and standing on a Forest tile they have literally no chance of hitting her. She gets quite the nice level out of mauling them. Two stats capped now. More importantly, she got another point of Strength.


One Soldier goes for Ross, misses him. They survive being doubled by him, thanks to attacking him from the Forest tile, but that's okay. Ross gets a great level out of taking them just in front of death's door. One more point of Speed and nothing unpromoted will be able to double him!


One of the eastern Archers is baited out by Eirika, misses her. Awesome.
I like her pose in this frame. Casual.


Ballista goes for Colm, misses.
The "Missed!" text goes by really fast for map animations, it's actually pretty annoying. I'd thought I'd missed it entirely, in fact, though you can barely see the text disappearing -that white line centered on Colm.


The southern Archer goes for Tana. That's laughable damage, given that it's hitting super effectively. They miss her anyway, which is excellent.


Lastly, the other Soldier Ross is going for chucks a Javelin, missing Ross.

First enemy reinforcements of the map. The Mercenary is carrying a Zanbato he'll drop when killed.


First thing I do on my turn is have Ross tear apart the Javelin Soldier. The other Soldier will suicide on him on their turn, now.


Marisa kills the southern Archer with a first-strike crit, which was totally unnecessary. She gets a depressing level, too.
Ugh.


Amelia goes for this Soldier in the southeast, and even dodges their retaliation in the process of butchering them. Nice.


Neimi uses her Ballista to murder the last enemy Ballista-Archer, incidentally confirming that Ballista can double-strike enemies. Awesome.


Lute breaks out Elfire to one-shot the Knight Eirika lured out, and gets a solid level out of it. She could really use more Defense, but this is perfectly good.


Tethys gets Neimi going again, and she takes a shot at the Ranger.
... and misses. In restrospect, I wish I'd had her kill one of the Soldiers.


Dogpiling ensues to get the Ranger gone before they cause any real problems. Annoying that Vanessa missed her attempt. Anyway, Artur lands the kill and gets a great level.

I end turn like this.
I wanted to have Colm go for the Archer, but his odds of death are way too high, in part because he'd be in reach of other Rangers.


Enemy turn, and Ross kills the last of his Soldiers, taking no damage in the process.


In the middle area, the two Enemy Soldiers go for Artur and Lute and it ends poorly for both of them. They both miss, in particular. Excellent.


Meanwhile Tana successfully baits out a Cavalier, dodging their attack.
I'm getting really lucky so far.


The Archer down here goes for L'arachel, and finally an enemy lands a hit on this turn.


Then this Ranger comes running up and doubles Artur, though they miss one of their attacks in the process. He'd have lived regardless, but ugh. Artur, stop being so slow.


Last enemy actions of the turn are the Sleep Staff jerk failing to hit Vanessa, the Physic Staff guy healing the surviving Soldier, and more reinforcements showing up in the northwest.
I am so glad the Sleep Staff guy missed. On my first run he hit Eirika on 17% odds... which didn't end up mattering because in the same turn someone else ended up dead, but uuugghghhhgh.
He's not going to get another action, so my lack of a Restore Staff isn't a problem now.


Before that, let's have Marisa double this guy and... get no crits. She dodged his retaliation, so that's good, and she needed two crits to kill him, but this is still getting a bit annoying. Mauthe Doogs! CRIT WHEN IT MATTERS!


Amelia takes a shot at the Cavalier... and misses against the odds. Eh. Not a big deal yet, and I got a lot of lucky breaks earlier on.


Tana lands the finishing blow, taking a weak retaliation in the process. That's fine, she'll heal off some of it via the Fort next turn. If somebody's gonna take a hit, this is one of the best possibilities.
Enough stalling. Let's make that Sleep Staff Priest cease to exist.

Hit the first.

Tethys.


Hit the second.
No more Sleep Staff Priest. Yesss.
That makes this a lot less stressful.


Vanessa takes out the last Archer of the map, gets a depressing level out of it. At least it's not just Luck. I hate the irony of gaining just Luck.


Artur and L'arachel team up to take out the last middle Soldier. (The one the Physic Priest healed)

I end turn looking like this.
Yeah, I'm aggressively baiting out enemies with Eirika. She's tough stuff. Plus I couldn't find a better way to avoid risking L'arachel being killed by the Ranger's bow. I'm in part exploiting the AI here...


Eirika dodges the first Knight to go for her, and fails to get a crit. As such, this Knight yet lives, and blocks off other enemies from attacking her.


First we bounce over to the left, where the Zanbato Mercenary lands a hit on Lute and is promptly crit-killed on low odds, thanks to the *Thunder Tome's small boost to crit chance. Lucky!


Then the Hand Axe Fighter goes for Lute, lands a low-odds hit, and is killed.
Without a crit.
Whoa, wait what? 11 times 2 does not exceed 30. What's going on here?
Turns out the *Thunder Tome is a Brave Tome. As such, instead of doubling the Fighter, Lute would've quadrupled them if they hadn't died to the third hit.
Holy crap, this thing is actually awesome.
Also, I finally manage to catch the spell's animation, which it simply shares with the regular Thunder Tome.


Anyway, back over to the east, it might not be obvious but this Ranger doubled Eirika.
... and missed both shots somehow.
Uuuh. Okay.


Then the other Ranger comes up and also misses! (This guy doesn't double Eirika, though)
If all three Ranger attacks had connected, Eirika would be dead. The odds of even one of their shots missing were fairly low, even before you consider True Hit.
This attempt at this mission is getting crazy luck, wow.


Lastly, the Physic Priest heals the Knight and two more reinforcements spawn in the northwest.


My very first action is to have Neimi take a shot at the injured Ranger. She lands the hit and gets another fantastic level. Nice.


Colm brings me back closer to the average by missing his attack on the healthy Ranger. Too bad.


Marisa comes shooting up from the south to get in damage.
Still no crit, though at least she landed her hit.


Artur and Vanessa combine forces to finish off this Knight.


I have a bit of a brain wave. Eirika vaporizes the seriously wounded Ranger, and Amelia wipes out the Priest from a distance, freeing up the eastern slot.


Tana goes for a strike, and actually lands it.
Now the Ranger is pinned. He's carrying a Sword, so he's not helpless, but his options are limited and he can't get in horrific damage on Vanessa or Tana.


Tethys gives another move to Neimi and gets another fantastic level, including two +2s. She may yet have a good HP score at level twenty without an Angelic Robe being wasted on her.

Neimi takes a potshot at the pinned Ranger.
In retrospect, this was possibly a dumb move. Not sure.
At least she's in position to trigger her Support with Colm, anyway. That helps them both.


Then I have L'arachel finish off the Ranger, netting her a good enough level.
Risky, given that they would've doubled L'arachel and killed her with either of their shots, but I was concerned Marisa was going to end up dead if I didn't take them out, and anyway L'arachel didn't really have anything better to do.
This ends my turn, incidentally.


First Knight goes for Tana, misses her and
awww come on
I hate level ups that give nothing but a point of Luck. It's like the game is mocking me.
Plus, Luck isn't a high priority once you have enough to not fear random 1% crit chances off of goobers. Even if it wasn't like the game was mocking me, I'd still rather have literally any other stat.
Oh well. I've been getting so much good luck in the combat stuff... I mean, really, it's better to get unlucky in combat and lucky in level-ups, because good level-ups can mitigate bad luck in combat. (See: last mission, where Amelia was so tough that Mauthe Doog doubling and critting her wasn't a real threat to her at all) But still, whatever.


Knight the second goes for Marisa, landing their hit and getting crit one time in exchange.


Over to the west, a Mercenary and a Fighter both go for Ross. Annoyingly, they both land their hits, though on the other hand Ross landed both of his hits. Eh.


Last attack of the enemy turn is a Cavalier getting himself mauled by Tana.


And now we have tons of reinforcements -not only the usual pair in the northwest, but also piles of Cavaliers spawning from Forts in the east, plus in the southwest Cormag shows up with a couple of Wyvern Riders. Ugh. This turn is not a happy turn.


Cormag's carrying a Toxin Lance instead of his usual Steel Lance. That's cool. No surprise that he's another Gargoyle, either. Weirdly, he's been raised to level 15, where normally he'd be level 11 here. This makes his overall stat boosts less impressive than they might otherwise be -his Speed is noteworthy, as it's gone up by 6 points, which is more than he could acquire in 4 levels, and his HP has gone up 5 points, which is also impossible to gain in 4 levels normally, but otherwise it's perfectly plausible that Wyvern Rider Cormag would end up with similar -or even better!- stats at level 15. Just a matter of getting good rolls overall. Still, most level 15 Eirika Route Wyvern Rider Cormags are going to be lower stat than this Cormag.
Hurts that he's lost a point of Move, though, and surprisingly his Constitution isn't any higher.
(Specific stat modifications: +5 HP, +3 Strength, +4 Skill, +6 Speed, +3 Luck, -1 Move)
Overall, I'm expecting to bench Cormag, just because Tana and Vanessa are perfectly great and his combination of poor Luck and awful Resist just does not compare favorably to Tana and Vanessa. Tana is also level 15 right now, and she's better in every stat except HP (Only behind by 2), Skill (Only behind by 1), and Constitution. (Admittedly behind by 3, and leveling won't fix it) Her Luck, in particular, is more than twice his Luck. Vanessa is also level 15 while comparing favorably to Cormag: 2 less Strength than him, 5 less HP than him, 2 less Constitution than him, but otherwise she's also better in every stat than him.
It's not like I need even more fliers when I have a flight of Mogalls. They're not vulnerable to Bows, and they can consistently attack from range 1 and range 2, so they're overall a lot better, too. Cormag could be nice if Vanessa and/or Tana got really bad growth rolls, I guess?


Anyway, the first thing I do on my turn is have Neimi take out this Fighter. Ross has to retreat in the face of the incoming enemies, and I've got more than enough units to take care of what's going on in the east for the moment.


Two Knights vaporized without anybody taking damage.
Oh, and Tana finally actually uses that Heavy Spear she joined with.

Vanessa finishes off the Cavalier here.


Then I have Tethys give Neimi another move and have her soften up this Cavalier. There wasn't really a clear good move to make, honestly. Might've made more sense to heal someone, not sure. I figured the quicker my enemies are dead, the less damage my guys take, and this is a timed mission.

Anyway, movement happens, and I end turn looking like this.


The Mercenary to the west goes for Eirika, misses. She mauls him in exchange.


Over to the east, I seem to be missing a screenshot. Regardless, one Cavalier goes for Amelia, misses, and the one Neimi shot goes for Colm, misses, and dies. Colm gets an okay level out of it.


Two more Cavaliers go for Amelia, and are still missing and getting maimed for their trouble.
Nothing else of interest happens on the enemy turn.

Artur opens the turn by weakening a Cavalier with Lute's moral support.

Neimi takes out the Mercenary Eirika weakened, because I'm still trying to get the western side under control without getting overly aggressive with it.


Ross goes to tear apart this Cavalier, and somewhat concerningly takes a hit back.


Tana takes out another Cavalier, and I miss the actual Miss, but you can see the Cavalier is in the middle of returning to their default position while having done no damage. Would rather she traded rolls with Ross, but oh well.


L'arachel goes to take out this southern Cavalier, keeping her relatively safe. To my annoyance, she gets a low-odds crit on the second attack. Regardless, she nets an okay level out of it.
She looks pretty cool when getting a crit, anyway.


Vanessa goes to kill this Cavalier to the north, and like Tana before her, I don't manage to get the screenshot until partway through the Cavalier's "returning to position" animation.


From there I heal Ross and do general moving around, among other points making sure to block off Neimi so nothing can get at her and kill her. I also have vague plans to maybe attack Aias soon, hence part of why so much of my force is in the east here.


More toward the west, a Mercenary goes for Eirika. He lands a hit and takes a hit, but she's fine. Mostly.
Mostly I'm annoyed at how close she is to leveling.


One Cavalier in the east decides to go for Tethys. She dodges well enough.


The last interesting move of the enemy's turn is the remaining Cavalier crippling themselves on L'arachel, admittedly bringing her to the brink in the process.


Even more reinforcements arriving from the eastern Forts.
This mission has way too many reinforcements.

The first thing I do is have L'arachel attack a Cavalier... having missed the pre-battle screenshot somehow. Argh.


Neimi, Lute, and Artur work together to start cleaning out Cormag's Wyvern Rider friends.
Plus maim a Fighter, okay.
The goal here is, in part, to open the way for Eirika to recruit Cormag. She can reach him this turn, just not with these enemies in the way.


Marisa goes for the Mercenary and gets the crit she needs, for once exactly when she needs it!


Vanessa breaks out the Axereaver to slaughter the Fighter Artur weakened earlier, easily dodging the retaliation.

Finally Eirika reaches Cormag and recruits him.
 YOU KILLED MY BROTHER, PREPARE TO DIE!
 What? No I didn't. Though I really wanted to, for the juicy experience.
 Lies! Words alone will not convince me!He said he saw me at a party once, and instantly assumed I was a gentle and kind person, probably because I'm human and female.Huh. That is something he's said to me and no one else ever, probably.Sooo... do I kill you for experi-What dastard could possibly benefit from convincing me to kill you!?Er, are you asking me or-VALTER! That snake, of course it would be the man who explicitly told me something I now believe to be a lie!Also he's known for his unnecessary cruelty and general untrustworthiness, to the point that the Emperor threw him away. Wait, did you actually trust him-Dark Lady of Renais, I join your forces.Uh. Okay. There goes those experience points...I care about NOTHING but revenge, you see. I was trying to kill you for REVENGE, but since Valter is Gradosian and I want nothing but REVENGE, that makes me a traitor by default.I... see. I'll not question this bit of good fortune, sir Cormag. Since you're here anyway, could you kindly butcher some of your fellow Gradosians? This battle is a bit of a mess.This has nothing to do with my REVENGE.... I see.But I'll do it anyway because, really, just waiting for Valter to show up so I can kill him would bore me to tears.Note to self: inform Seth that Cormag is not to be trusted under any circumstances with anything except the task of killing Valter, if that.
Over back to the east, Ross tears apart a Cavalier easily.


Cormag breaks out his Killer Lance to take out this Wyvern Rider, because the Toxin Lance can't possibly get the kill. He gets reasonably lucky, dodging the retaliation and getting the crit he needed on his second hit -would've preferred it on the first, but this works too.
Also we get to see Cormag's design, and I actually quite like it, even if I'm not sure what it has to do with his original design. His Wyvern is a bright blue as Wyvern-riding Cormag, not this shade. To differentiate him from Tana, I guess? Regardless, I do like it.


Tana goes to maul a Cavalier in the east, trusting in her durability to get her through.

Amelia takes out the last of the original Cavaliers while trying to get ready to take on the northern reinforcements.


Marisa gets an assist from Tethys to reach this Fighter, and gets a double crit... when she only needed one crit to kill them. She also dodges the retaliation, which is excellent. She gets a level with none of the things I actually want on her right now, which is not so excellent.

Some final moving up happens, with me ending turn like this.


First thing in the enemy turn is that over in the west, Lute avoids an attack by moving through the nth dimension or something. Seriously, that's just bizarre-looking.


Over in the east, the Cavalier Tana weakened goes for Colm, lands his hit, and then dies to Colm's retaliation.


First Cavalier in the east to go for Tana. They miss. Even on a Fort, they're in trouble.
Kind of annoyed I didn't think about how they'd hang out on the Fort, though. Blocks reinforcements, which arguably is a good thing, but, you know, experience points. Plus for all I know this Fort is going to spawn a guy who'll drop a thing that's useful. Also the defensive bonuses they get, of course.
In the end it turns out my concerns are moot, though, as no reinforcements occur this turn.


Cavalier in the north reaches Amelia and lobs a Javelin, missing. In retaliation, Amelia chucks her Slim Lance at him twice, thanks to Colm Trade-manipulating her on my turn.


Another Cavalier goes for Tana, this one outside of her range, and even though he has the worst odds of hitting yet, he lands his blow. Eh.


Nothing else happens, not even reinforcements, so now it's my turn -Marisa tries to critkill this Mercenary, and nothing doing. He even lands his retaliation. Can't you have a better distribution of crits?


Neimi's Ballista is out, and Tethys helps her get to the next one. Neimi uses the new Ballista to finish off the Mercenary Marisa failed to kill.


Meanwhile, Ross joins the fighting to the east, dodging an enemy retaliation in the process.


Tana takes out the Cavalier on the Fort, and even dodges the retaliation, which is nice. Main point was this guy was a threat to Ross.


I finally acknowledge that my forces are getting rather beat up, and have L'arachel and Colm heal themselves.


Amelia finishes my turn by taking out the Javelin guy who foolishly attacked her. She continues to be a dodge machine.


The first action of the enemy turn is for a Cavalier to foolishly attack Tana, miss, get doubled for most of his health, and give her a.. well, it's not a great level, but it's not a terrible one either.


Two Cavaliers go for Tana with Javelins. The second one is the one in the Forest beside Ross, but I missed the screenshot. Regardless, one hits, one misses. She's still alive, though she could've died on this turn. Unlikely, but possible.


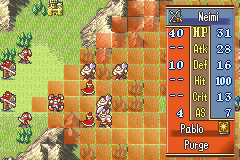
Even more reinforcements arrive, including Pablo and his giant army. The three points of note are: the Brigand with a Stealable Body Ring (This is part of why Colm was moving to the west), the Warrior who will drop either a Hand Axe or a Swordslayer on death, and...
... that Pablo has Purge. I'd... thought he had Bolting for some reason, and a check of Serenes Forest shows that I have no reason to think that. It also shows that he's replaced Elfire with Aura, just to make this harder for me.
This is concerning. He can easily one-shot a lot of the members of my force, as only Eirika and Tethys aren't vulnerable to Light magic. Tethys isn't much help, with no means to attack him, and Eirika isn't going to solo Pablo's army.
Well, my recollection is that he doesn't move, so... I can give up on Stealing the Body Ring, disappointing as that is, and just back away and focus on getting experience out of his goons as they approach. Could be worse.


First thing I do on my turn is have Amelia murder one of the Cavaliers, netting her a lackluster level. That's okay, she's had so many amazing levels.


Ross joins in one the fun by attacking from a Forest at a distance with his Hatchet. Finishing off the Cavalier nets him an amazing level, short only on Resist. Awesome.


Neimi takes out one of Pablo's Brigands with Tethys' support, getting a fantastic level in the process, among other points capping Speed.

Then I end turn looking like this, in full retreat from Pablo. Plan is to take out Aias over here on the final turn.


First action of the enemy turn is the most injured enemy Cavalier going for Tana, missing, and dying.


Then two of the new Cavaliers go for Ross, and both miss even though one of them is at the weapon triangle advantage. Nice.


The last one decides to chuck his Javelin at Amelia, presumably not wanting to trigger Ross' retaliation, but it's futile.
Then-


-AAAAAAAAAAAAAAAAAAAAAAAAAAAAAAAAAA
PABLO MOVES.
WHY DOES HE MOVE?!?!?
Sheer blind luck prevents Cormag from dying here.
Uuugh. I hate this mission normally, and this just makes things more horrible than ever.
New plan: get Pablo killed ASAP.


Uuuuh.
I... wasn't actually expecting that to work.
Neimi crit-killed Pablo with the Ballista with Colm's moral support. I... was expecting to at least need to have Tethys give her a second move.
Uh. Wow.
Neimi gets a decent enough level out of it, considering her Speed is already capped.


The most horrible part of the map behind us, Eirika goes to double a Cavalier to death via Rapier. She not only dodges the retaliation, she gets a fantastic level -she only missed out on Strength, out of stats she can actually raise right now.


Amelia weakens a Cavalier and Ross murders another.


Tethys heals Lute, and general moving up happens -I'm now trying to engage Pablo's army. I want those lootables, and with Pablo down it's a lot more reasonable for me to try.


The first action of the enemy turn is for the Sword-wielding Cavalier over here to suicide on Ross.


Another Cavalier goes for L'arachel, cuts her health in half, and is mauled in turn.


Then we jump over to the west, where I do a bad job of catching screenshots of a Brigand and the Warrior both making ranged attacks on Neimi.
The only reason Neimi isn't dead right now is that the Warrior missed his second attack. They both doubled her, thanks to the Ballista weighing her down so much.
Maybe engaging Pablo's army wasn't such a good idea.


Last interesting event of the enemy turn is the last Cavalier going for L'arachel. He hits her, but he's one point short of killing her so it's all good.


Ross and L'arachel both promptly take the eastern front out of the fight.


Neimi retreats to relative safety and takes a potshot at a Brigand in the north, and Colm steals the Body Ring. I'm leaning on his dodginess and my intention to get a bunch of enemies killed to see me through.


Vanessa and Lute easily mop up the Warrior, netting Lute a mediocre-but-relevant level and getting me the Swordslayer.
Well, that's something good to come out of the Warrior going for Neimi earlier.


Marisa charges a Brigand and easily kills them.
Marisa, why do you keep double-critting or not-at-all-critting when you just need one and not-at-all critting when you need both? What is this?


Cormag swoops in, takes Vanessa's Axereaver for himself, and cripples a Brigand.
... wish he had just one more point of Speed so he'd kill this guy in one round.


Instead I have Tethys give Cormag another move so he can kill the Brigand to the north and have Artur move up and finish off the Brigand Cormag weakened. With Lute's moral support, he can tank damage decently, and I need to reduce access to Marisa, among other points.

I botch catching my end-of-turn position.
Fingers crossed. This is the last turn.


First a Mercenary goes for Cormag. Unsurprisingly, he hits and dodges Cormag's retaliation. Annoying, but I couldn't do anything about it really. That crit chance could've taken this to bad places, though.


First of the Cavaliers goes for Marisa. She dodges, big surprise, and gets a crit on one of her retaliatory strikes, which is totally useless. She wouldn't have killed them if she'd crit twice, in fact. Annoying.


Second Cavalier goes for Colm, lands his hit.
Tense.


The two Mages gang up on Colm too. I miss the attacking screenshot for the first somehow, but he landed his hit, bringing Colm to the brink.
The second Mage, however, is the last attack of the map, and Colm is thrilled to report that the guy missed.
Whew.
Made it, and without eleventy-billion tries. Just a lot of good luck. (And like five tries or something, most of which died in the first five turns)
Talking ensues.
 Hello there my Monsters of Rausten! Thanks for the rescue!
 Anytime, m'lady!I am SHOCKED, shocked I say! I would never have guessed that the eccentric and obviously wealthy lady from Rausten named L'arachel was, in fact, the princess of Rausten named L'arachel!
 I assumed you recognized her from one of the many diplomatic events and were just being polite.Her disguise was impenetrable!
 Are... are you still being polite?Oh, don't be absurd Tana! While you apparently penetrated my cunning disguise, not everyone is so lucky!You're wearing your royal dress. Papal dress? How do theocracies work with princesses, anyway, that's always confused me.PERFECT DISGUISEYES TANA HER DISGUISE WAS PERFECT
 I AM IMITATING AND AGREEING WITH EIRIKAStop that Innes, it's annoying.Oh come on!
 Ladies, can we hurry on to Jehanna already?The mysterious mercenary scumbag has a point. We really shouldn't waste time. To Jehanna!To Jehanna!... to Jehanna!You're not cute enough to make that not annoying.aaaaaaaaaaargh
---------------------------------


After the talking has ensued, I'm given 5000 gold and I have Eirika use the Body Ring. My army in Monster Quest is heavily slanted toward high Constitution, and Eirika has run into trouble a few times from her low-ish Constitution, even with Monster Quest having increased it, so I felt she was probably my best choice.

That takes us to the world map.
See you next mission.


Comments
Post a Comment